
0
No products
To be determined
Shipping
$0.00
Total
This item added to your cart. Calculate any delivery cost at next step.
Quantity
Total
There are 0 items in your cart. There is 1 item in your cart.
Total products
If you are doing research before joining the more than 80,000 customers that have rented our camping and travel gear, or have already received your camping gear rental package from us, here's where you can learn about the setup and operation of specific camping or travel equipment before you head out on your next trip.
The information below provides more details on how to set up the privacy shelter we rent, but we encourage you to give us a call or find more resources online if more details are needed. For more information on this rental item including rates, check out the main product page at Rent a Portable Privacy Shelter. There are more how-to pages on nearly all of our most popular rental items; find most at our video and user guide to rentals main page .
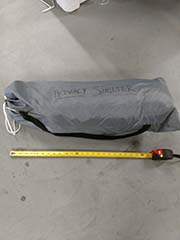
The privacy shelter we rent is basically a tall, skinny single-wall tent without a floor. It's easily setup and taken down, and packs down into a small package as shown below. It weighs only 7 pounds.
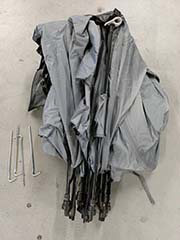
Like most tent-style structures, there is a body, poles and stakes
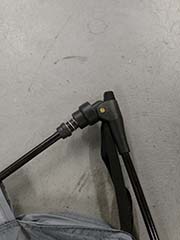
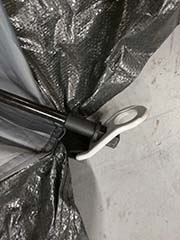
The pole segments are connected with elbow joints that straighten out for setup and are locked into place with a sliding cover. Do not overly force the poles into position; if you are struggling, you don't have it lined up correctly - see more below.
A key to keep in mind is that the "skeleton" of the shelter - the pole sets - will be on the outside of the structure. The first thing you want to do is unfold the shelter enough so that the top of it is free and visible. Lift it from the pole hub on the top as high as you can and the pole segments will start to come together. There are 3 joints to each leg; lock in the top 4 first, then the second 4, and then the bottom 4.
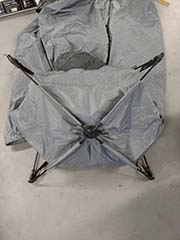
Once up, it will look something like this pic below, before spreading it out and staking tighter.

Inside it's about 6.5' tall at the center point. There are vents available to open, and not that the door zipper pull is only accessible from the inside - to keep pranksters at bay! A great companion rental to this shelter is the portable camping shower we rent!

There are flat barriers on 3 of the walls to help keep dirt from coming inside and you can also put rocks or sticks on them to help keep the shelter secure. Due to its high profile and narrow base, this shelter will not hold up well in heavy winds, so you are better off lowering it or taking it down in bad weather.

To take it down, reverse the steps above - pickup the tent from the top to take the weight off of it, and then start folding the pole joints back up, this time starting from the bottom.
This video below isn't ours and it isn't the exact same shelter, but very similar to our rental to show you the above from start to end.
The information below provides more details on how to set up the privacy shelter we rent, but we encourage you to give us a call or find more resources online if more details are needed. For more information on this rental item including rates, check out the main product page at Rent a Portable Privacy Shelter. There are more how-to pages on nearly all of our most popular rental items; find most at our video and user guide to rentals main page .
The privacy shelter we rent is basically a tall, skinny single-wall tent without a floor. It's easily setup and taken down, and packs down into a small package as shown below. It weighs only 7 pounds.
Like most tent-style structures, there is a body, poles and stakes
The pole segments are connected with elbow joints that straighten out for setup and are locked into place with a sliding cover. Do not overly force the poles into position; if you are struggling, you don't have it lined up correctly - see more below.
A key to keep in mind is that the "skeleton" of the shelter - the pole sets - will be on the outside of the structure. The first thing you want to do is unfold the shelter enough so that the top of it is free and visible. Lift it from the pole hub on the top as high as you can and the pole segments will start to come together. There are 3 joints to each leg; lock in the top 4 first, then the second 4, and then the bottom 4.
Once up, it will look something like this pic below, before spreading it out and staking tighter.
Inside it's about 6.5' tall at the center point. There are vents available to open, and not that the door zipper pull is only accessible from the inside - to keep pranksters at bay! A great companion rental to this shelter is the portable camping shower we rent!
There are flat barriers on 3 of the walls to help keep dirt from coming inside and you can also put rocks or sticks on them to help keep the shelter secure. Due to its high profile and narrow base, this shelter will not hold up well in heavy winds, so you are better off lowering it or taking it down in bad weather.
To take it down, reverse the steps above - pickup the tent from the top to take the weight off of it, and then start folding the pole joints back up, this time starting from the bottom.
This video below isn't ours and it isn't the exact same shelter, but very similar to our rental to show you the above from start to end.